Ed Force One model by Revell - anybody building it?

evil_ash

Nomad
Is anybody out there building the Revell 1/144 Ed Force One model kit?

I picked my kit up yesterday, it is very nice. The decals look fantastic. The retailer told me that the kit has sold out from his supplier in Germany (where Revell are based), and that they are selling very well in the UK.

I'll start on my kit in a couple of weeks or so, was hoping to get some tips from others that are making it as well.

PART_1470807149239.jpeg
 
Not working on that one, but I did my own version from a generic 1:300 scale kit a few months ago, so I can offer more general kit building advice.
 
Thanks Brigantium, I may well take you up on that offer :)

I intend to start the kit next week. I will take a few photos of the build as I progress, and share them along with advice in this thread. Hopefully someone will be inspired to have a go at building the kit.
 
Okay, I have made a start on building the 1/144 scale Ed Force One kit from Revell. Two things were immediately apparent when I unboxed the kit. Number one - this bird is big :) 
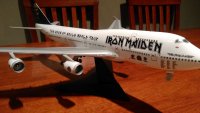
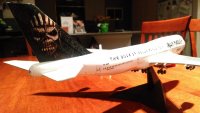
Fuselage length is 50cm, and wingspan is 45cm. This makes it much larger than any of the die cast EF1 models that I have seen online.

Here is the contents of the box:
IMG_20160819_212401.jpg

The second thing that jumps out is the fantastic quality of the decals. This thing should look great when completed - the Maiden markings are outstanding. I love being able to see the names of the cities on the side of the plane!

IMG_20160819_212531.jpg

The third thing that I noticed is that this is an old kit i.e. this is an old Revell 747-400 kit that they have repackaged as Ed Froce One, rather than a brand new mold. This has two implications; 1), you need to make some adjustments to the kit's parts to build an exact EF1 replica, and 2) being an older mold it has some imperfections that the modeller needs to clean-up.

For an example of #1, there are several windows that you need to "open" buy cutting them with a sharp knife, as shown below. You can choose to avoid cutting open the windows by simply cutting the window decal surrounds instead. The latter would be the easier option for a less experienced modeller.

IMG_20160820_125054.jpg

An example of point #2, there are imperfections (known as "flash") that you need to clean-up when building the kit, as shown below. Nothing too serious, but not the kind of thing you see in a more modern kit.

IMG_20160819_212459.jpg

Anyway, on to the actual build of the kit :) I started by washing all of the parts and applying a grey acrylic primer. Then I glued the fuselage together and held it tight with masking tape and clothes pegs. The glue will be left to dry overnight. I also assembled the front landing gear, which needed to be inserted into the fuselage before the two halves could be joined together.

IMG_20160820_214533.jpg

That's all for this first nerd-tastic modelling post. I hope to have time tomorrow to construct the wings, as well as work on the engines and the rear landing gear.
 
Last edited:
It looks good. I'm not bothered about removing flash, the big thing is that nothing is well out of scale and the two halves of the fuselage go together well. Are there clear plastic inserts for each window? I think the only airliners I've done had decal windows or marked spaces to paint and gloss.

I thought that might be a big kit. My 1:300 scale one has an 8 1/2 inch wingspan
 
Are there clear plastic inserts for each window? I think the only airliners I've done had decal windows or marked spaces to paint and gloss.

They are decal windows i.e. a silver decal window frame for each of the window holes in the fuselage. Should be quite effective.
 
Can you put miniature figures of Kim and Chad from Tulsa next to it?
 
I was hoping someone would do the entire Maiden party, complete with family members and Rod Smallwood.
 
Looks interesting. I haven't built a plastic model kit in a few years, so may well be tempted by that one.
 
I was hoping someone would do the entire Maiden party, complete with family members and Rod Smallwood.

My plan is to put a picture of Bruce in the cockpit window, with myself sitting beside him at the controls. Physical manifestation of a long - held fantasy haha.
 
Quick update, I have assembled and painted the rear landing gear, as well as the exhausts for the four jet engines. The wings are also assembled, and the glue of the fuselage has set nicely.

IMG_20160822_213539.jpg

I had to use a bit of putty to fill some gaps in the fuselage, nothing too serious.

Next step is to airbrush the main engine sections white, glue on the exhausts, and complete the engine assembly. I will then paint the main fuselage white and attach the rear landing gear. Hopefully I will be ready to glue the wings on by the end of the week, so that I can add the amazing Maiden decals this weekend.
 
Managed to make some progress over the past few days. First up, I completed the rear landing gear and attached them to the bottom fuselage panel. I decided to follow the advice given above and leave this section off the main fuselage until after decals etc have been completed.

IMG_20160826_225926.jpg

Next, I painted the fuselage pearl white and sealed it with a glossy varnish. This is an important step as it makes applying the decals much easier. Here's a photo of a very dull looking white fuselage, with a Japanese WWII fighter beside it for scale :)

IMG_20160826_230147.jpg

Now I finally arrived at the most exciting part of the build - applying the kick-arse markings! The decals in this kit are truly wonderful, and went on very smoothly. I used Microset and Microseal to place and seal the decals.

IMG_20160830_212900.jpg

It was very satisfying to get the city names on the nose of the plane - I resisted the temptation to put a tick beside the shows that I attended....

The tail section and "World Tour" decals are very large, and I was worried that I would have trouble seating them correctly. But they went on easily and never felt in danger of ripping.

IMG_20160830_212934.jpg

The instructions for adding the decals are very clear and easy to follow. The attention to detail is brought home by the ability to build the kit to match Ed Force One either before or after the Chilean airfield accident - a very nice touch.

IMG_20160826_230027.jpg

That's all for this update. Next stage is to finish painting the engines and the wings, complete application of the decals (still some windows to do), and then glue the entire thing together.
 
The instructions for adding the decals are very clear and easy to follow. The attention to detail is brought home by the ability to build the kit to match Ed Force One either before or after the Chilean airfield accident - a very nice touch.

Talk about attention to detail. :D
 
It's looking good. Thoughtful of them to include the pre and post-Santiago colour scheme. Someone will now probably make a resin replacement damaged cowling to modify the kit to mid-Santiago Incident.
 
Almost done now - near enough that I have mounted the model on a display stand. A few small tasks still to go; paint the front landing gear, a few miscellaneous decals to be applied, fix one of the gear bay covers. But here she is:

Nose view.jpg

The kit does not come with a display stand. I modified a spare one that I had (plastic, from an Airfix kit for a 1/24 Hurricane) and it works pretty well. I went for the stand option because the kit is not well weighted. As per the instructions, I added a 20g weight to the inside of the nose during construction - but the model will not sit evenly on its landing gear. The nose slowly rises upwards - I could have added more weight internally, but went for the "coming home" look of landing gear down and coming in to land :)

The engines are a favourite feature, some really nice detail on them. I stuck them all in a polystyrene pyramid for painting, decal application, and varnishing:

Engines.jpg

The engines add a nice sense of scale when affixed to the wings:

Side view.jpg

Speaking of scale, here is the model next to my Maiden FC mug:

Scale view.jpg

My overall opinion is that this kit is well worth the time spent building it. Yes, there are a few issues with it - old mold with lots of flash, parts that don't align very well, putty and sanding required at times, the odd dodgy instruction - but the attention to detail is excellent, the decals are astonishingly good, and the end result is very satisfying. I highly recommend having a go at the kit, especially if you are after a large-sized memento of what was a fantastic world tour!
 

Attachments

  • Fuselage view.jpg
    Fuselage view.jpg
    487.3 KB · Views: 8
  • Tail view.jpg
    Tail view.jpg
    487 KB · Views: 6
Nice! The tail artwork decals are very good. I might have to look into getting one of these. Although I do like the diecasts too.
 
Very well done. I have one in the stash, but won't be doing it for a few months. How did you go about cutting out the extra windows?

Slightly off topic, but a previous build of mine that I made for a Battle of Britain group build competition. I named it "Aces High" 1:72nd Spitfire flying over a scratch built White cliffs of Dover Dio.

FkXcXOv.jpg
 
Back
Top